Showing posts with label DIY FX. Show all posts

Saturday, November 13, 2010

Thinking About A Werewolf

 One of the major components in what's going to make The short film REDD impressive is how the creatures look. Specifically the Giant Wolf Beasts. 

The creatures vary in the actual feature script. We'll see some zombies, vampires, demon like creatures, but since it's a spin on Red Riding Hood, then it's the Wolf Beasts that must be our heroine's "Stormtrooper."


I'd like to show that there are all manner of Wolf Beasts in this dark and evil forest, quadrupeds, bipeds, wolf-men, wolf-women, smaller wolf like creatures, and giant beasts of all kinds.  Right now, for the short, I can really only express one kind and I want it to be the biggest, and most menacing.

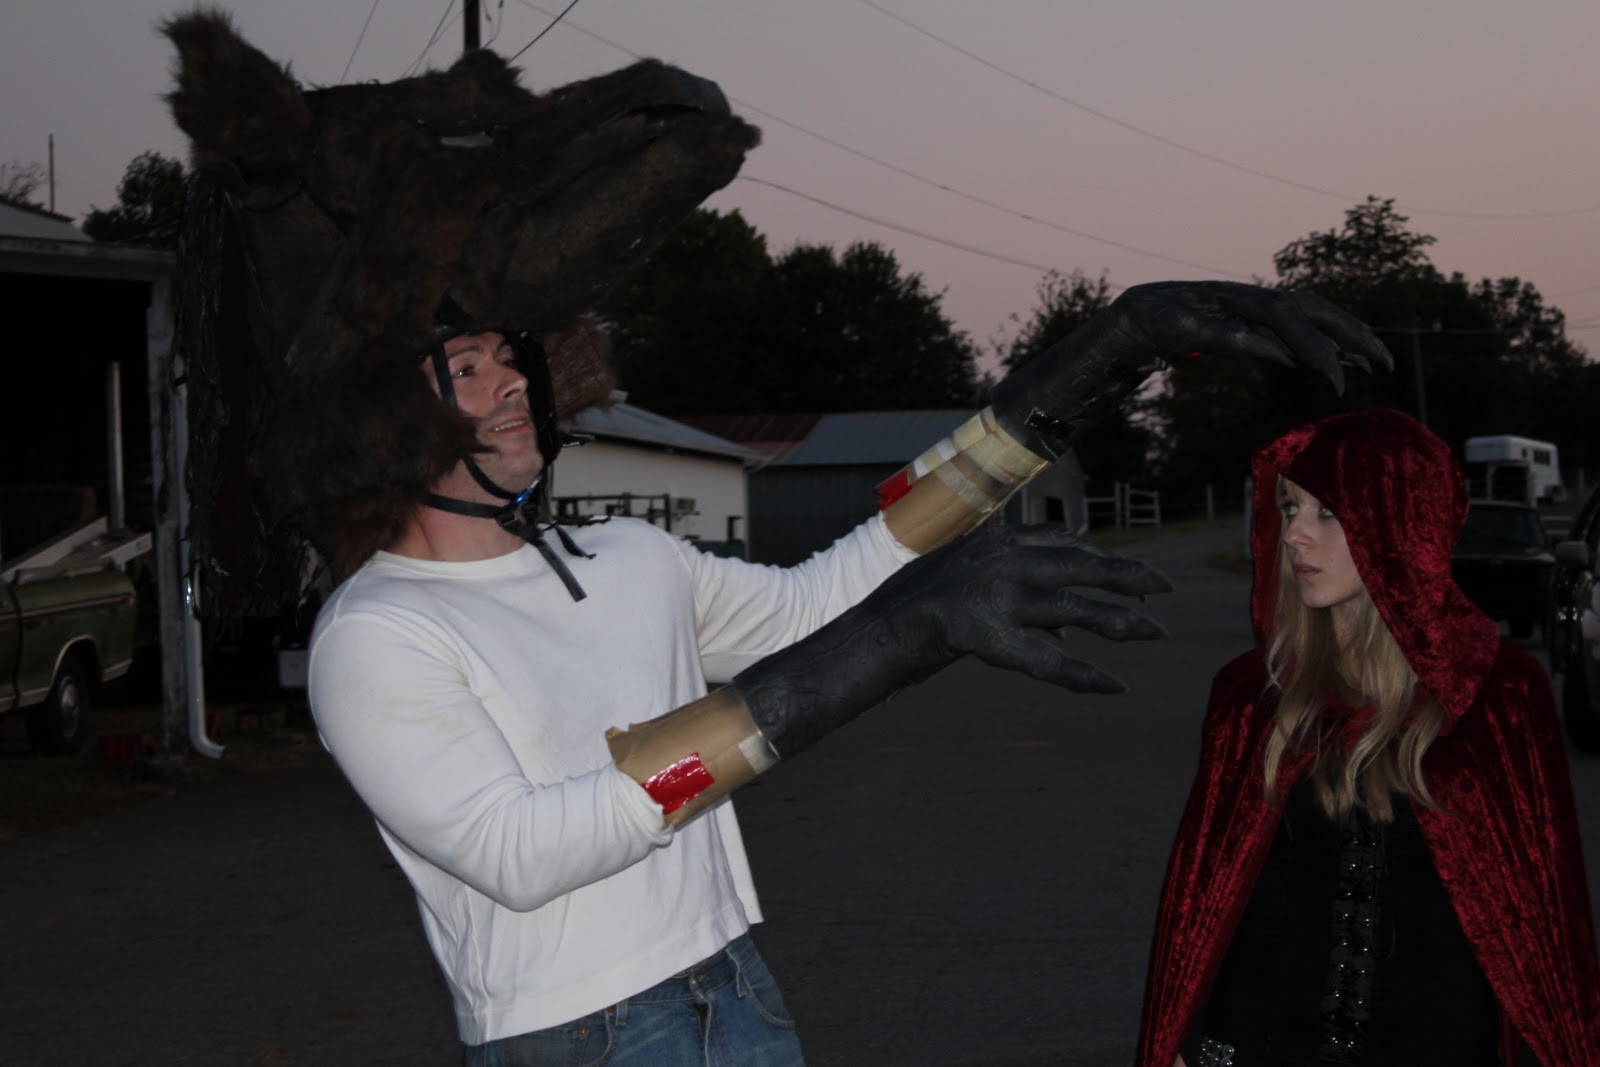
I've posted some of these pics before on my progress. Built the head out of cardboard, duct tape, and faux fur, and fashioned the giant claws out of giant monster gloves I bought on sale, and stuffed them with paper and cardboard.


Then I did some test shots with Brandon White so I could get a feel for how I needed to fashion the rest of the body.


And here are shots of Richard Gaither being goofy next to April Crum. I needed to get a live perspective on how tall the head would be next to April. It already towers over her without Richard being on the stilts.


It's just that pesky body and torso I need to get around. One thing's for sure, we'll have a complete Werewolf before December.

Really this post is just so I could lay out what I've got so far, and really look at what needs to be done.

Tuesday, October 12, 2010

Quick Reel 2010

Been working on a site for WTW Productions. Wanted to have some sort of demo available, so I threw this together. It will of course improve and lengthen the more footage we get in with the T2i. But a neat little start so far.


Saturday, August 28, 2010

Forced Perspective Research

Thinking through some possible FX scenes.

LOTR Forced Perspective


LOTR Forced Perspective Moving Camera


Forced Perspective Shots


Giant Robot FX Test


Movie Magic Episode 5 - Forced Perspective


The Keeper Of The Cardboard Key

Tuesday, March 2, 2010

Practice

Today so far has been all about figuring it all out. What can be done? When can it be done? And how can it be done?

Doing a number of camera tests today. Trying out different filters in post. Also writing out the initial score. Yes this is for Creep, but sadly my brain is set on high, so I'm also contemplating another feature idea. Once again I'm walking that actor/director line. I think Creep will be great, but it does require me to play the lead, which I know I can do. But this new project that I am contemplating keeps me behind the camera, which is where I kind of want to stay just to make sure all goes smoothly.

Especially looking at the camera tests so far and working through this footage. This is going to require some real tender, love, and care. All my projects do (well most of em), but if I'm really trying to create something in the cinematical aces, then I really have to put extra care into the behind the scenes work.

Thankfully the internet provides some help with that. There are a slew of folks who've already done the work for you. Do a search on Vimeo or even Youtube for whatever camera you plan on testing, and chances are you'll find someone has already tested it for you. Light tests and all.

At some point today I will breaking to make a meatloaf. Then I will watch LOST. Then I will return to tests, scoring, and then re-writes. If you've been a previous cast member in anyone of my projects in the last few years, you may very well get a random message from me today or tomorrow.

Someday, it won't snow, so I can shoot outside. Someday .

My Indy Mogul episode is still getting me some great feeback. The episode itself is actually a recut of a video tutorial I did back in 2008. Since then a few folks have felt inspired to work on their own DIY Necronomicons, many of them blow mine out of the water. And that's what it's all about isn't it? To post your tutorial in the hopes that someone out there will be inspired and improve upon your techniques. Because of what I've seen in these vids, I'm going to revisit my prop and improve on mine.

Feel free to visit these videos, rate them high, and subscribe to these folks.

From SkullProduction97


From x0fx3


From ddexpress


Seriously great work guys!


Friday, November 27, 2009

Thankful

I am very thankful. For my life, for the ability to breathe, move, think, see, hear, and to just be.  I'm so thankful for a roof over my head, and walls to shield me from the outside elements. A bed to sleep in. A bathroom with a functioning toilet and a clean shower. A kitchen I can cook in.  My car.  My computer.  Electricity. Water. I'm thankful for family, and friends.  I'm so very thankful for my wife, my pal, my best friend.  I'm thankful I have her to lean on, to live with, love with, and just be myself with.  When I hold her I always feel like I'm home, and I'm so very thankful I have her.  I'm also thankful that she is so supportive of me and my crazy efforts to make movies.

I'm so thankful for this amazing opportunity I have to make my dreams happen. I'm thankful to be alive, and to understand and comprehend how fortunate I am to do what I'm able to do. I'm so thankful for the freedoms I have to pursue these goals.  It's mind blowing what it took to make me realize that all that I needed to accomplish my goals, I already have.  I have heart and soul, desire and skill, and a wife who believes in me.  Put that with my freedom and I have everything I need to create something truly amazing.

So our typical Thanksgiving events involved, cooking dinner, eating dinner, conversations about space travel and Star Trek, random house cleaning, and then me in the ice cold garage spray painting a Werewolf head.  All of this narrated by FX's Home Alone marathon.  I really love that movie.


I used different shades of fur and felt, I needed to paint him to even out all the colors.  Also I wanted a darker used look, like he'd been running out in the wild for a while.  Also needed to color black around the eyes to help accentuate the glowing red eyes.

The hair needs more work. I need more spray paint and fur, and then it'll be all about the legs and the body.  I hope to do some test shots this Tuesday and or Wednesday.  I'll also try out the new camera crane as well.

The body I'm still trying to figure out.  I can't afford enough fur to cover an entire body, especially since this guy is going to be a giant.  I'm going to have to cheat and give him some kind of clothing.  A robe perhaps with some sort of torn baggy pants.  Nothing so generic as a T-shirt and jeans. I am going to clone this guy into an army in After Effects.  Some sort of cloth, toga, or monks robe, or something along those lines.  I'll have a better understanding when I see the mask and hands on an actor.

I still need to finish my Snicker's Ad.  I really need to pick a day next week and just knock that out.

Wednesday, November 25, 2009

Even Closer

Went out and bought the materials I needed to continue on the wolf. Felt, Craft Fur, Plastic Table cloth. Again, I'll go more in depth in the VLog, but for now here's a pic of where I'm at with the Wolf Head.


My inspirations for this wolf came from the classic wolf fantasy flick In The Company Of Wolves, but also Rob Bottin's FX work in The Howling, as well as Stan Winston's work in Predator.  And as with anything I create, props, costume, or FX wise, I always get inspiration from Jim Henson.

Gotta give it a bit more fur, then give it a once over with some spray paint, then it's on to the body, and then the legs and stilts.  So far I've spent about 35$ on this. I'm hoping to keep the costs low, but I do expect the final cost of this build to be around $50 to $60.

Still need to make time to work on that Snicker's Ad.  More later.

Friday, October 23, 2009

Tuesday, October 21, 2008

DIY NECRONOMICON The Video

I can't believe this took me two weeks to put together. Anyways, here it is in all it's Evil Dead glory. How to make your very own Evil Dead Necronomicon Ex Mortis Book Of The Frickin Dead.

Friday, October 3, 2008

Necronomicon: Book Of The Dead. The DIY Version.

I can comfortably say that I've gotten at least one thing done on my list. I made my very own Necronomicon. Or to be exact, Necronomicon Ex Mortis. The horror geek in me has to specify that if I say Necronomicon then I'm refrencing H.P. Lovecraft's Necronomicon. When I'm actually leaning more towards the Book Of The Dead featured in Sam Raimi's Evil Dead Trilogy.


Legend has it that it was written by the Dark Ones. Necronomicon ex
Mortis, roughly translated, "Book of the Dead". The book served as a passageway to the evil worlds beyond. It was written long ago. When the seas ran red with blood. It was this blood that was used to ink the book. In the year 1300 AD, the book disappeared.


For the current Monster Cops Episode I wanted to refrence Evil Dead 2: Dead By Dawn, seeing as how I love the Evil Dead movies and this particular episode is titled Monster Cops: Dead By Dawn. The plot itself doesn't actually have much to do with the Evil Dead mythos, but I wanted to make a nod to it. The Monster Cops breach a very evil vampire lair and I wanted them to come across some evil objects. So why not have one of those objects be a Necronomicon? Plus I though it would be fun to build one.

The Necronomicon has actually changed appearance throughout each Evil Dead film. Here's what some of them look liked.

The Necronomicon Ex Mortis from the very first low budget film Evil Dead. This lower budget version looks pretty creepy to me, but I was always much fonder of the look they used in the sequel.


Here's a frame from Evil Dead 2: Dead By Dawn.


A closer look at the version from Evil Dead 2. The budget obviously went up on the prop making. I do love this look quite a bit and is the look I was leaning towards when creating my own.


And this is the version in Army Of Darkness (Evil Dead 3). The prop making budget went all the way up this time around thanks to Universal Studios. Still holding to eerieness but looked alot more subtle with much better quality.


The limited edition DVD's of Evil Dead and Evil Dead 2 came in really cool looking Necronomicon covers. But even they somewhat differ from any of the above designs of the book.


And here's the first pic of mine.

Wasn't going for exactness, but I wanted to stay with the same feel as the Evil Dead trilogy. I wanted the eyes on mine to be much angrier. This didn't actually cost me much to make since I had all the materials already. The base of it is a cardboard box duct taped together to form the actual cover and spine. The wrinkles in the skin were made from masking tape and duct tape. The eyes, nose, and mouth were formed with long rolled up pieces of duct tape then sealed down with masking tape. Then I painted it with acrylic, using black for the inside of the eyes and mouth, and the rest painted with brown mixed in with some cadium red.

Right now I'm sealing the whole thing down with Mod Podge sealer to give it some strength and so the paint won't run, just in case it ever gets wet (have you ever been on one of our sets?) I'm going to finish the back, and then fill the middle in with actual pages of monster drawings and images just as soon as Mr. Brandon White finishes them.

I'll post a video tutorial as soon as it's finished. This will actually only make an appearance in the current episode for about 10 seconds, but I think it will lend alot to the feel of this episode.

Sunday, September 7, 2008

Vampire Brides, Take 1

The Dead By Dawn episode requires three Vampire Brides. 2 of which I had cast for sure. The third, I'm still looking for actually. I wanted to stick with the traditional look of the Vampire Brides (aka Dracula's Brides) each girl very beatiful but with different looks. Normally each girl has different hair color, dark, red, and blonde. I have a few choices right now for a blonde, but I have yet to actually talk to those choices. We'll see how it works out.

Let's focus on the two we've got. Kelsey Granger, our dark haired vamp. And Cat Degroot, our red head. I was going to wait til I had found the blonde and shoot the three altogether, but Kelsey had to head back to school soon, so I decided to go ahead and shoot Kelsey and Cat together. Now I didn't have the location I wanted yet so I had to do something I was trying to avoid. Green screen.

Green screen means shooting your actors in front of a green (sometimes blue) screen, and then do composite work in editing. Meaning I remove the green screen from behind the actors, and then place any background I need behind them. I've seen it done very well, and I've seen it done badly, and I've done it both well and badly. Either way, for a project like monster cops where I'm trying to get the most realistic feel possible, using a green screen wasn't something I wanted to do (you never see any bad cg fx on Cops now do ya?). I was already rolling my eyes at the crappy cg'd gun fire I put in The Midnight Special. This time around, I was determined to keep any cg or compositing to a minimum, and try to do every single effect practical and on set.

But in some cases you are left with no choice but to do the best with what you've got. So some cg and compositing would now be required. The thing about The Midnight Special was, I didn't have the best computer resources in the world. I was using a somewhat satisfactory program for my fx work, and I'm quite surprised I was able to edit a 90 minute movie on that frickin computer (80 gigs/256 ram, I pushed it to it's limits.) Now I'm blessed with a computer that is entirely too powerful to exist, oh, and a little something called Adobe After Effects CS3. So now I'm ok with doing a bit of CG and composting if I can do it well and only where it's needed.

Did you hear that Hollywood? WHERE IT'S NEEDED!!!!

Majority of the FX would be done on set. Any monster fx, most of the blood squibs, any gore, etc. would be done live. CG would be used if absolutely necessary, and only as a tool to help tell the story or achieve the scene if we couldn't achieve it any other way, and not just for the holy hell of it (see Van Helsing 2004).

So a green screening we went. Sadly I had to use the same green material I used back in the days of Living Dead Girls. Does anybody remember my Living Dead Girls series? Either of the 2 of you reading this? No? Me neither. Thankfully the creases in the sheets won't matter much. The solid green background is going to be helpful enough in compositing. Also most of the pitfalls you get when green screening on a low budget can be avoided since many of the Vampire Brides scenes are fairly short, and also take place in deep dark hallways and tunnels. Hopefully you won't even be able to tell the difference when I actually start editing.

Here come the pics. Including a few frames where I decided to play with the compositing software a bit.

Two of the three Vampire Brides in front of our amazing green screen. Cat on the left, Kelsey on the right. Aren't they adorable?


Arlanda doing the make up thang.


Me directing Kelsey


I think I made some kind of joke about Vampires making bunny ears.


Could our green screen have anymore creases?


Not only does Arlanda do make up but she knows how to fix costuming issues as well. She rocks.


Still messing with the costume.


Cat is trying to seduce the camera.


Arlanda applying more make up to Kelsey's arms. Because a Vampire with a sun tan just isn't very realistic.


She had a very even tan.


Cell Phone Camera Pics.
The fangs are great, but ya gotta hold em in place forever.


If you didn't know already, there's always alot of waiting around on set. Brandon and Chris on set as well.


Cat being Cat.

Kelsey minus the green.


Threw in a bit of a glow here.


Cat minus the green. Although I do notice some of it, but that's me being picky.
Horrible edge work here, something you won't see in the final cut.

Did a color correction just to see if I could bring out her hair color. Make it pop.

Just a little test to see what you can do with a green screen. Here are the two girls in front of our crease filled green sheets. Let's take out the green. You can see a bit of an outline of the green, especially around the hair, but it's fine.
Let's throw in a public domain photo of a cemetary.
And let's smooth it all out with a few filters. Black and white, with a blue tint. Went for that old, old, antique film look. Really we could have done much more, but you get the idea behind using a green screen.


A few more shots.


Overall I had a good time shooting that day. Hopefully the girls had fun too. They were wonderful to work with. I'm confident we got some great shots, and the footage should look fine in the final product. Ah the final product, can't wait to see what that looks like.

And if you haven't yet please help us out by registering at project breakout and voting for the monster cops WOLF HUNT short. Everyone get's 15 votes a day, so feel free to vote for us 15 times every day. Click the banner below.

.